Webhook Automations
Sometimes you need to send data outside of Builder Prime, and this can be completed using webhooks.
You can use a Webhook Automation in Builder Prime to send your customer and project data out of Builder Prime to be used in a variety of ways. Some examples would be sending information to a review service, adding projects to a Google calendar, or creating new records in another software you're using.
Webhooks by Zapier is a popular tool we've seen other accounts use to create their webhooks. This does require a paid Zapier account, as webhooks are a premium offering in Zapier.
1. First, you'll want to begin the setup for your "Catch Hook in Webhooks by Zapier" following these instructions.
Once you've created the webhook URL, copy that and go back to Builder Prime to build the Webhook Automation.
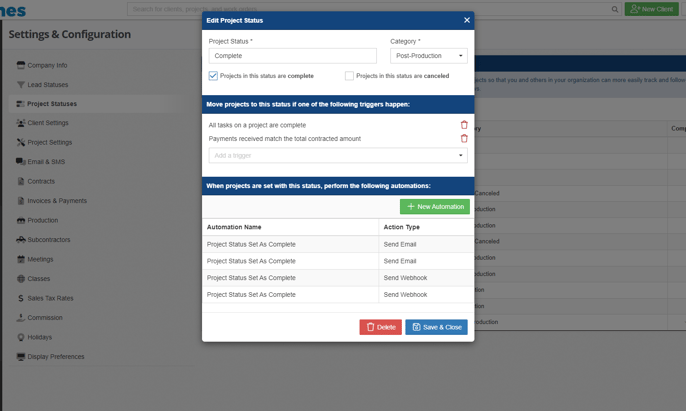
2. Navigate to the lead or project status under Admin > Configure Lead Statuses or Admin > Configure > Project Statuses.
Click into the status that you intend to be the trigger for sending out the client or project information.

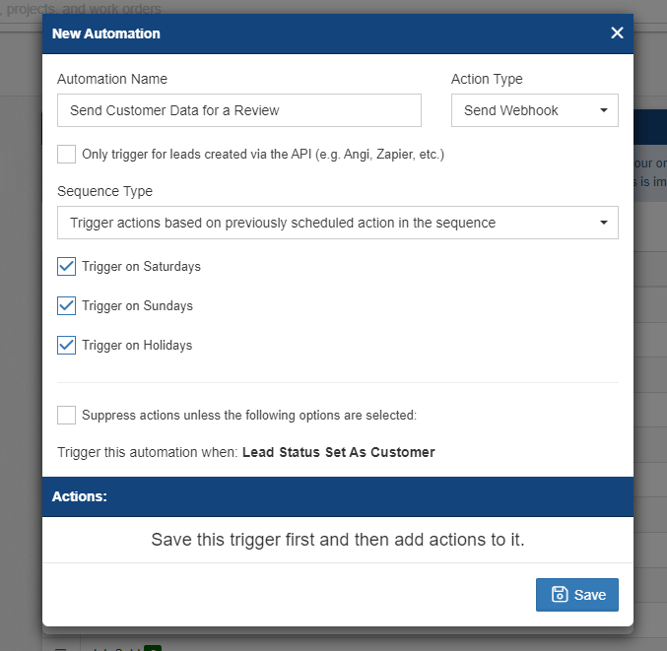
3. Click on "+ New Automation." and choose "Send Webhook" as the action type.
Addition settings to consider are whether you want this webhook activated for leads created via the API or if you want this sent out on weekends or holidays. You can also set up a suppression if this webhook action is applicable for certain classes or project types.

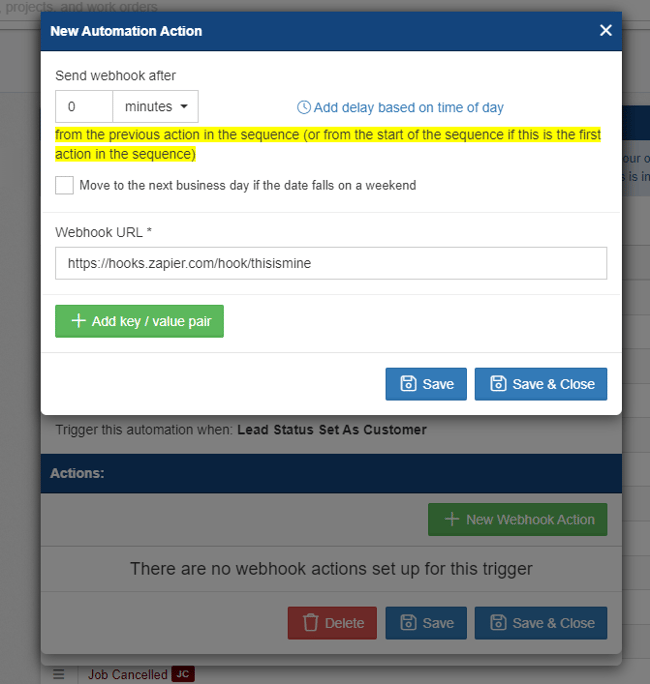
4. After saving the initial settings, click "New Webhook Action" to set up timing and add the URL. Click "Save & Close" 3 times.
After the lead or project moves to this status, the automation will send after X minutes/hours/days/etc.

Note: you can always add a key/value pair to the webhook to include in addition to the standard fields that will get sent over. This can be useful if there are specific values you always want to include in the data that gets sent as part of this webhook automation. See more below for the list of standard fields.
5. Trigger the action
Next, find an existing lead or project, or create a dummy lead or project, and move this into the status you created the above automation against, and wait for the automation to fire.
6. Return to Zapier to complete the setup.
Go back into Zapier and continue building the trigger step for catching the webhook. As long as that automation fired, you should see the sample record in Zapier before completing the trigger step.
7. Create the Action in Zapier
Once the trigger step is completed in Zapier, create the action step in Zapier for whichever software or tool you're connecting. You'll be able to use all the sample values that came over to Zapier when the automation fired in step 5 above in order to map that data into the correct fields.
8. Test the Completed Action
Once your fields are mapped, you can test the webhook by moving another lead or project into the status that contains the webhook automation. Save the Zap and make sure it is turned on.
From now on, all of the relevant data from your lead or project record will get sent exactly when you want!
Standard Fields Included in Webhook Automations
In the example above, we created the automation on the project status, so the data in that webhook will contain project context data. If you create the webhook automation on a lead status or meeting type, it will have data based on the client context or meeting context.
The standard fields that are sent in webhooks for the project context are as follows:
type (value will be "project")
projectId
projectName
description
projectNumber
estimatedValue
estimatedStartDate
estimatedFinishDate
completionDateTime
worksiteAddressLine1
worksiteAddressLine2
worksiteAddressCity
worksiteAddressState
worksiteAddressPostalCode
projectManager
salesPerson
foreman
opportunityId
clientFirstName
clientLastName
clientEmail
clientMobilePhoneNumber
clientHomePhoneNumber
clientOfficePhoneNumber
clientMobilePhoneNumberExtension
clientHomePhoneNumberExtension
clientOfficePhoneNumberExtension
projectType
projectStatus
class
The standard fields that are sent in webhooks for the client context are as follows:
type (value will be "client")
opportunityId
clientId
clientFirstName
clientLastName
estimatedValue
closeProbability
dialerStatus
externalId
leadSource
leadStatus
salesPerson
leadSetter
projectType
buildingType
class
companyName
notes
doNotContact
bestContactTime
bestContactMethod
mobilePhoneNumber
homePhoneNumber
officePhoneNumber
addressLine1
addressLine2
city
state
postalCode
mobilePhoneNumberExt
homePhoneNumberExtension
officePhoneNumberExtension
Additionally, any custom fields for the client or project will be included based on the context. And any other custom key/value pairs that you define in the automation will be included.
The standard fields that are sent in webhooks for the meeting context are as follows:
type (value will be "meeting")
opportunityId
clientFirstName
clientLastName
title
description
location
startDateTime
endDateTime
isMeetingConfirmed
isMeetingCancelled
meetingType
class
-1.png?width=100&height=75&name=original-tar-ruler%20(1)-1.png)