-1.png?width=100&height=75&name=original-tar-ruler%20(1)-1.png)
You can export Clients (as Customers), Contracts (as Estimates), Invoices, and Payments from Builder Prime to QuickBooks Online (QBO).
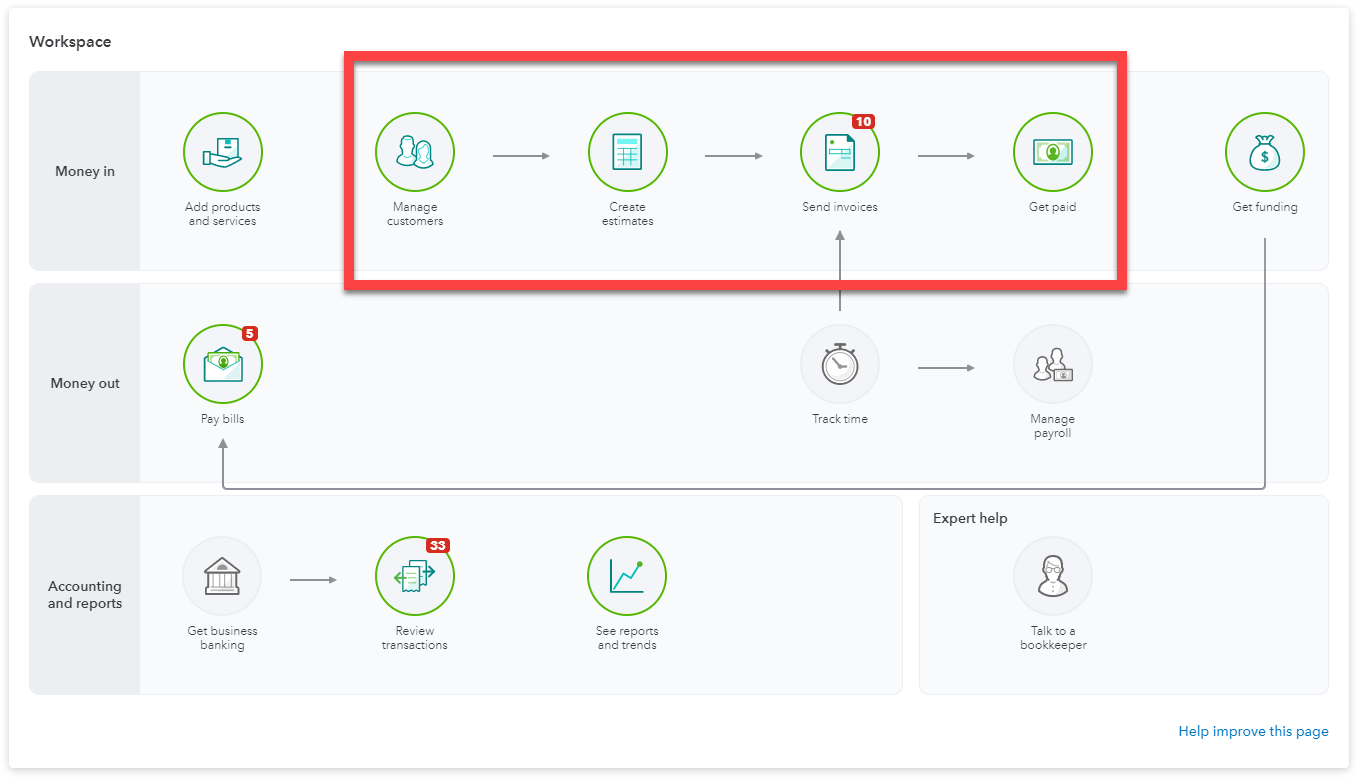
Your dashboard in QuickBooks Online should look something like the screenshot below. The part that is in the red rectangle is what Builder Prime will automatically copy over to remove the need for duplicate entry.
Connecting to QuickBooks Online
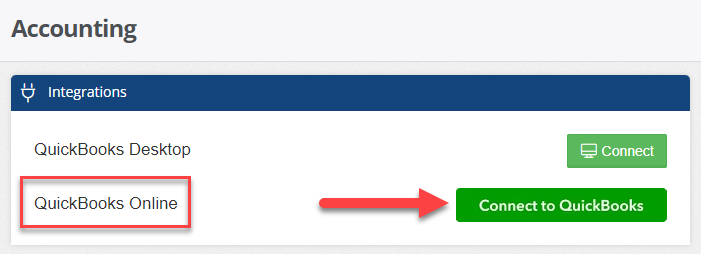
The first step in setting up the export to QuickBooks Online is to connect your Builder Prime account with your Intuit QuickBooks Online account. You can initiate this connection by going to the 'Admin > Accounting' screen from the main navigation in the Builder Prime Admin Console. Once on this screen, you will see a box labeled 'Integrations' with a button next to the QuickBooks Online label to 'Connect'. Click the 'Connect' button and you will be taken to a login page for your QuickBooks Online account.
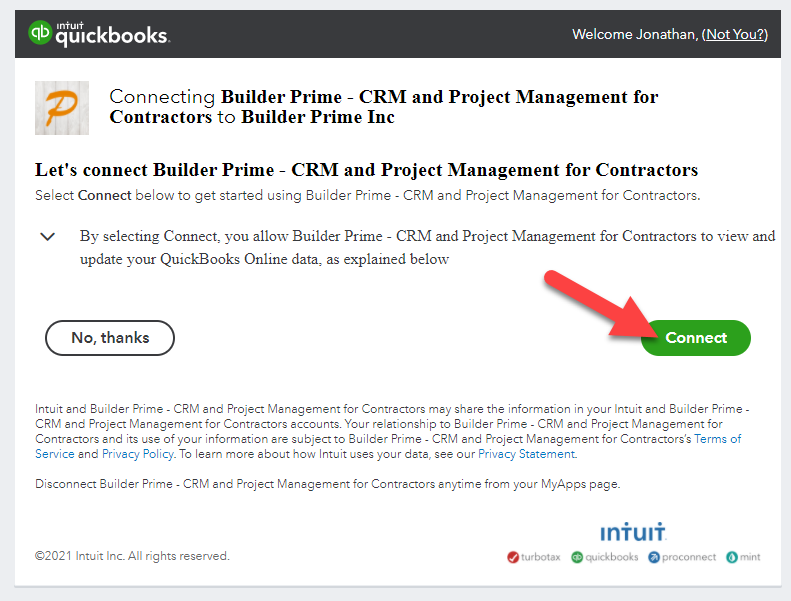
You will need to enter your login credentials in this screen for QuickBooks Online. These credentials may (and should) be different from your login credentials for Builder Prime. Once you sign in, you will then be prompted to connect your company in QuickBooks Online with your Builder Prime account. Click 'Connect' and you will be redirected back to the Builder Prime Admin Console.
If the connection was successfully made, you will see a button to 'Disconnect'. You can click that button should you ever need to remove the connection between Builder Prime and QuickBooks Online. Please note that you need certain admin privileges in QuickBooks Online in order to manage the connection.
Settings / Configuration
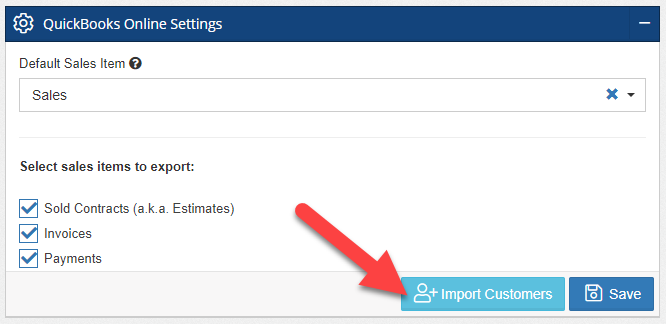
Once the two apps are connected, you will see some new boxes appear on the 'Accounting' screen in your Builder Prime Admin Console. You will see a box labeled 'QuickBooks Online Settings' where you can set up how you want the export to function. First, you can set up a default Service/Product in the drop down. The drop down will be populated with all of the 'Services/Products' from your company in QuickBooks Online. This default service/product will be applied to each of the line items in your estimates and invoices if you do not specify differently on either the project type, work order type, or project tasks. If the export from Builder Prime does not know which Service/Product to assign to the line item, the transaction will show as failed in the export queue. See some of the common types of QuickBooks errors and how to resolve them HERE.

Additionally, in the QuickBooks Online Settings, you will find the ability to select which types of transactions to export. The system will only attempt to export the types of transactions selected.
Accounting Codes
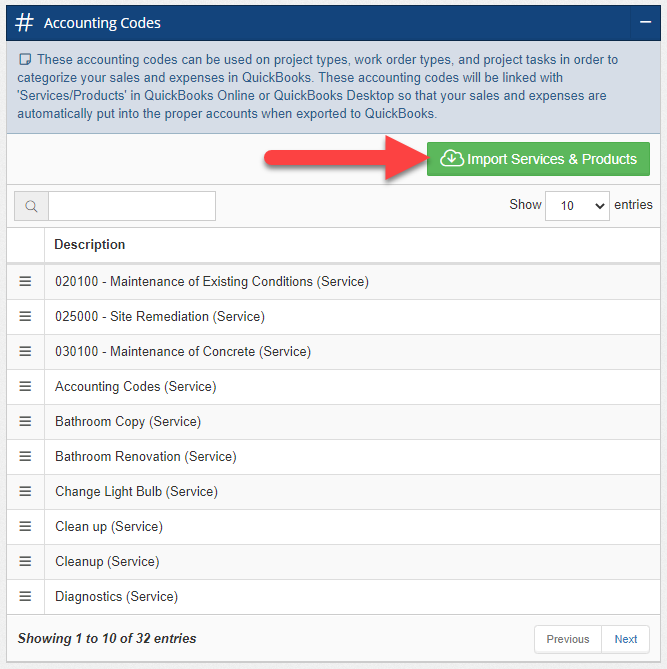
The next box you will see on this screen related to the QuickBooks Online export is the 'Accounting Codes' box. This represents the mapping of your Services/Products in QuickBooks. QuickBooks requires that every line item on an estimate or invoice have a Service/Product specified, so Builder Prime needs to tell QuickBooks which Service/Product to use. We can do that using the Accounting Codes. Simply click the button to Import Services & Products, and your list from QuickBooks will show up in this section and will be ready to assign to your estimate and invoice line items.
When Builder Prime exports your estimates and invoices to QuickBooks Online, it will first check if you have an Accounting Code selected on the specific Line Item or Task in your project. If there is one selected, that will get used when exporting to QuickBooks Online. If not, it will look for a default Accounting Code on your Project Type or Work Order Type. If you have a default selected, it will fill that in for any line items that do not have an Accounting Code selected. If you do not select an Accounting Code on the specific line item, and there is no default set for the Project Type or the Work Order Type, then the last place it will look is the overall default Service/Product as specified in the QuickBooks Online Settings (see above). If the overall default is not set and Builder Prime still does not know which Service/Product to assign the line item, you will see this show up with an error message in the Export Queue.
QuickBooks Online General Ledger Accounts
The QuickBooks Online General Ledger Accounts section lets you link specific accounts to purchase orders so that inventory, sales, and expenses are automatically pulled into the proper accounts during the export to QBO. For each section, mouse over the question mark next to the title to see the specific details for that entry.

Export Queue
The final box you will see on the 'Accounting' screen is labeled 'Export Queue'. This box has two tabs, one for pending items and one for completed items. The items shown in the pending tab are items that have not yet been exported to QuickBooks Online or have some error when attempting to export. Any error that may occur will be displayed in the 'Message' column of the table. If the transaction has been exported, it will be visible in the 'Complete' tab.
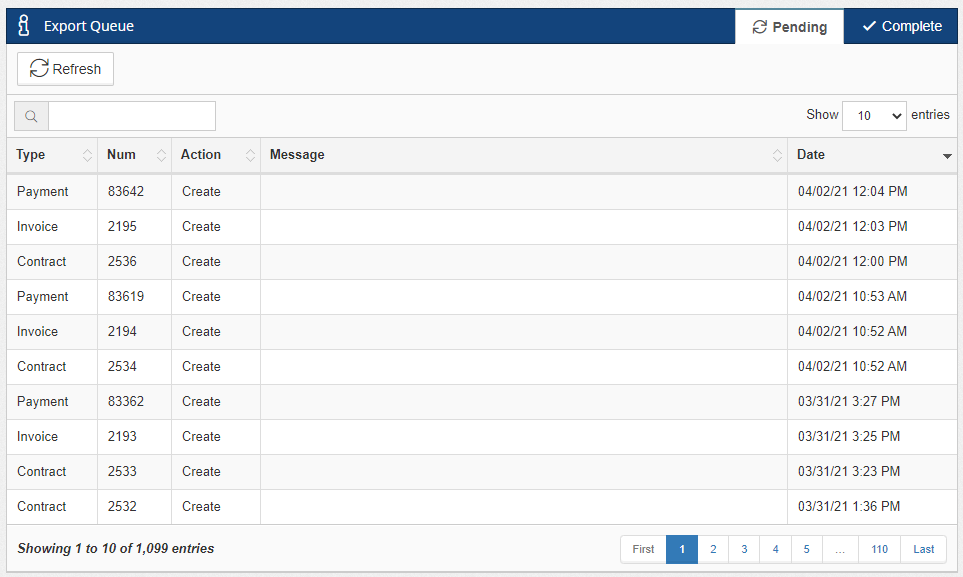
You can find additional information on managing your QuickBooks export queue HERE.
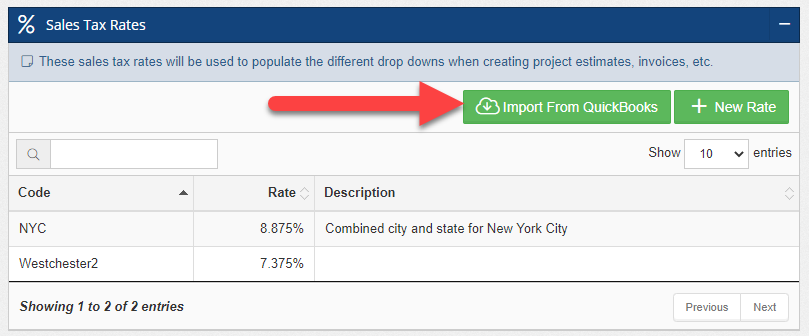
Sales Tax
If your business is required to charge sales tax, you should import your sales tax rates from QuickBooks Online in order to ensure that everything seamlessly flows over. You can import your sales tax rates by navigating to Admin > Configure, and finding the box labeled 'Sales Tax Rates.' From there you can simply click the button to import the rates and then you will be able to use them in your projects and work orders.
Exporting Clients/Customers
In Builder Prime, your customers are referred to as Clients, but when you export them to QuickBooks, you will see them referred to as Customers in QuickBooks Online. There are a couple of different ways that clients can be exported from Builder Prime to QuickBooks.
If you do not need a client to be set up in QuickBooks immediately, you can wait until there is a transaction to be exported for that client, e.g. an estimate or invoice. In that scenario, the export process will automatically set up the new Customer in QuickBooks Online if they do not yet exist. If the Customer already exists in QuickBooks Online, then that Customer record will be used and a new Customer will not be set up. The export first looks for an existing customer record based on the email address. If you do not have an email address for the Client, or if the export process does not find a Customer with the same email address in QuickBooks, then it will next try to find the Customer based on the Client's first and last name. It would need to match exactly. Our recommendation is that you try to rely on the email address as much as possible since that should always uniquely identify an individual customer.
The second option for exporting clients to QuickBooks Online is to initiate the export directly from the Client screen in the Builder Prime Admin Console. As long as you have permissions to export and the Client is not already linked with a Customer in QuickBooks, you will see a button at the bottom of the Client Details to export that client to QuickBooks. Click that button and the Customer will be set up immediate in QuickBooks Online.
Exporting Contracts
Make sure that the 'Contracts' option is selected in the QuickBooks Online Settings in the Accounting page of the Builder Prime Admin Console if you want to export Contracts to QuickBooks Online. Contracts are referred to as Estimates in QuickBooks Online. Contracts in Builder Prime may also be referred to as Proposals, Estimates, or Change Orders. Regardless of what you call it in Builder Prime, these transactions will always be found in the 'Contracts' tab of the Project Details.
The Scope of Work in the contracts created in Builder Prime come from the tasks that you set up for the project. Therefore, these tasks will also be what make up the different lines on the Estimate in QuickBooks Online. The export process will determine which tasks to include in the export based on the Accounting Codes set on each of the tasks. If you do not set any accounting codes on the tasks, it will fall back to the accounting code set on the project type. If you don't have a project type set or if the project type does not have an accounting code set, it will fall back the the default service/product specified in the QuickBooks Online Settings (see above). If there is no default service/product set, the export for the contract will fail and you will see the error message in the Export Log on the 'Admin > Accounting' page. Generally, only the Task Groups will be included as lines in the estimate in QuickBooks Online. The subtasks will only be included as lines in the estimate if the contract price was determined with a 'Markup on Cost' price type and the accounting codes differ across the subtasks within a task group.
Other information besides just the lines will get set up in the estimate in QuickBooks when you export a contract to QuickBooks. The customer will be linked to the estimate. The estimate number will match the contract number from Builder Prime and will be appended with '-bp' at the end of the QuickBooks reference number. If you have QuickBooks Online Plus and you have enabled class tracking in the settings within QuickBooks Online, then any value you select for the class on the Builder Prime Project Details screen will be exported as the class on the estimate in QuickBooks Online. If you enabled class tracking per transaction, the class will be used on the overall estimate, and if you enabled class tracking per transaction line, then the class will be used on each line in the estimate. The payment schedule on the contract document will be exported in the Message on the estimate. If you set a tax rate for the contract, that tax rate will be used in the QuickBooks estimate. Discounts applied to the contract will also be applied to the estimate in QuickBooks. Finally, the PDF contract document that was generated in Builder Prime will be copied as an attachment to the QuickBooks estimate.
Estimates will not be queued for export to QuickBooks until the associated Proposal / Estimate / Contract / Change Order is marked as sold in Builder Prime.
Exporting Invoices
Make sure that the 'Invoices' option is selected in the QuickBooks Online Settings in the Accounting page of the Builder Prime Admin Console if you want to export Invoices to QuickBooks Online.
Invoices created against a contract will automatically use the same Accounting Codes on each line of the invoice to match exactly to the corresponding contract. If you create an invoice that is not related to a contract in Builder Prime, then you will have the ability to select the Accounting Code for each line item of that invoice. If an Accounting Code is not selected on a line item, it will apply the Accounting Code set on the Project Type or Work Order Type associated with that invoice. If there is no Accounting Code set on the Project Type of the Work Order Type, then it will use whatever you set as the default Service/Product in the QuickBooks Online Settings (see above).
Invoices created against a contract will automatically get linked to the relevant Estimate in QuickBooks as long as the Estimate in QuickBooks was created from the Builder Prime export.
Invoices are queued for export as soon as they are created in Builder Prime.
Exporting Payments
Make sure that the 'Payments' option is selected in the QuickBooks Online Settings in the Accounting page of the Builder Prime Admin Console if you want to export payments to QuickBooks Online.
Payments are always recorded against an invoice in Builder Prime, and as long as that invoice was exported to QuickBooks from Builder Prime, any payments against that invoice will automatically be linked to that invoice in QuickBooks as well.
Payments are queued for export as soon as they are created in Builder Prime.
Exporting Purchase Orders
Make sure that the 'Material Purchase Orders' and/or “Subcontractor Purchase Orders” options are selected in the QuickBooks Online Settings in the Accounting page of the Builder Prime Admin Console if you want to export Material and/or Subcontractor Purchase Orders to QuickBooks Online.
Syncing purchase orders with QuickBooks Online gets rid of the need for manual data entry, reduces human error, and establishes real-time accuracy for inventory, supplier, and expense data between QuickBooks Online and Builder Prime.
Purchase Orders are queued for export as soon as they are created in Builder Prime.
Importing Customers
When you're just getting started with Builder Prime, you might find it useful to import your customer list into Builder Prime. We make it simple to do so! Just click on the Import Customers button at the bottom of the QuickBooks Online Settings section. You will then need to choose which Lead Status to import them into - most likely you will want to choose the Customer status. If you have a lot of customers in QuickBooks, the import may take several minutes to complete.
The QuickBooks integration is available starting with the Essentials plan. If you're interested in upgrading your current subscription, click HERE to learn how to upgrade your account.