Project Status Configuration
Project Statuses are crucial for tracking project progress. They help you monitor your projects as they transition from Sales to Production stages. By utilizing Project Statuses, you can automate follow-ups and ensure maximum efficiency.
Lead Statuses and Project Statuses work similarly by helping you track your projects as they progress through your sales and production pipelines. Projects begin in a Sales category for you to create your estimates and contracts and get them sold before they move into a Pre-Production or Production category. Project Statuses will help you keep things organized, automate follow-ups, and ensure that things keep progressing as efficiently as possible. Watch the video below for an overview followed by more detailed information in the article below.
The ability to customize Project Statuses is available starting with the Essentials plan. If you're interested in upgrading your current subscription, click HERE to learn how to upgrade your account.
You will see default project statuses set up within the CRM, but you can create and manage your own project statuses so they are applicable to your specific workflow.
To create a project status, head over to Admin > Configure > Project Statuses. Click on the New Project Status button at the upper right portion of the widget screen to create a new status, or click on any of the records to manage an existing one.

⚠️ NOTE: The order of project statuses in this list is very important!
To adjust the order, click and drag the handles on the left side of the list to reposition your statuses as desired. Projects should always flow from the top of the list to the bottom. Unless there was some mistake or other extenuating circumstance, projects should never move back up in the list.

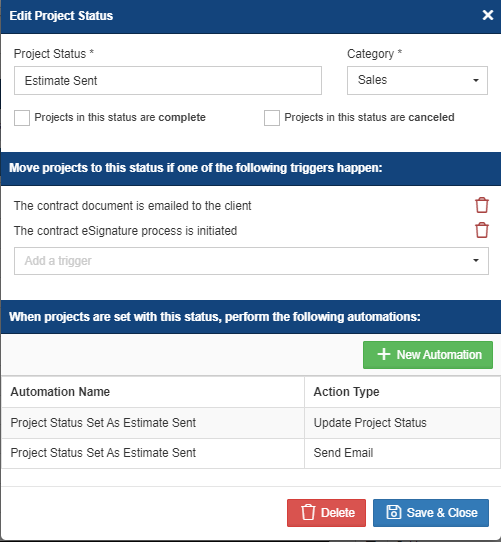
In the example below, we have a project status named "Estimate Sent" that we access by clicking on this item in the list above.

There are a few different fields that you can set for each project status. Let's break these down:
Project Status: This is the name used to identify the status of the project. This will be displayed in the drop-down field of a project record or as a filter (or "bucket") in the Projects list.
Category: The Category is used for a few different things:
- Permissions - You can control access to different projects based on project Categories. For example, you may allow your sales reps to access projects while they have a project status in the Sales category, but not if they have a project status that is in the Production category. This can be configured for each User Role in Admin > Roles.
- In order for Field users to clock in and out of a job, or view their assigned projects and tasks, the project must be assigned a Project Status that is in the Production Category.
- If you use the Department View display preference for the Main Menu View (see Display Preferences on the Admin > Configure screen), your projects will be grouped by the category in the Main Menu.
Projects in this status are complete: If you check the box for this option, it will tell the system that projects in this status are to be considered complete. It will automatically assign a completion date as soon as it moves into a status that designates projects as being complete. It will also show up on the Completed Projects report based on this completion date.
Projects in this status are canceled: If you check the box for this option, it will tell the system that projects in this status are to be considered canceled or lost. This will remove it from your production pipeline reports, and help show an accurate picture across other reports based on the fact that a project is canceled.
Project Status Triggers
Below the main fields for the Project Status, you will find the different triggers you can set to automatically move a project into that particular status when any of those trigger events occur. The system will already have some default triggers set up for you out of the box, but you can customize these any way you like. In the example above, we have two triggers on this Project Status:
- The contract document is emailed to the client
- The contract eSignature process is initiated
What this means is that the system will automatically move a project into the Estimate Sent status as soon as you email a contract document to the client, or you send the contract to the client for e-signature. You can click on the drop-down to add more triggers as necessary.
Important: Triggers, like project statuses should only move down in the list rather than back up. If one of the triggers happens once the project has already moved past that status in the list, the system will not move it back up the list. They only work to move the project down/further in the list.
Automated Sequences
At the bottom of the Project Status window, you will be able to manage automated sequences that get kicked off once the project has been in this particular status for a period of time. For example, you can have automated sequences to further update the project status after a project is already in this status period of time, send automated emails to your clients or employees, add call queue items for follow-ups, or add to-do items related to the project. For more information on how these automated sequences work, please see this article.
How to manually manage the project status on an individual project
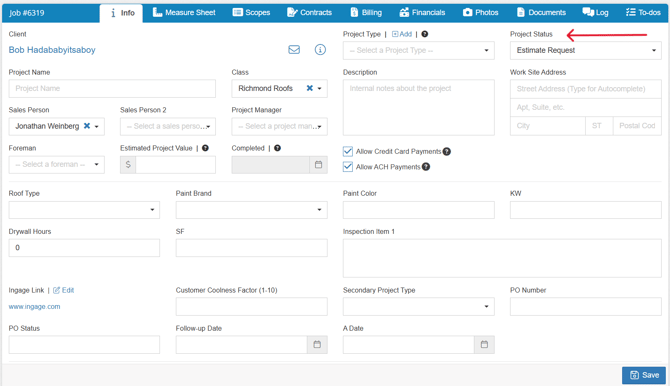
It's not always possible to automate every project status update. Sometimes it takes some manual intervention, and that's OK. When you need to manually update the project status, you can find the drop-down on any of your projects. You can set it manually here to anything that may be relevant. As shown in this sample project below it is under the Estimate Request status.

-1.png?width=100&height=75&name=original-tar-ruler%20(1)-1.png)