How to Manage Multi-Day Projects
You can manage your projects that span over the course of several days in Builder Prime. Below are instructions for using the Task-Based (grid view) templates, Price Book, and how to use predecessors.
Task-Based / Templates
How to schedule and manage multi-day jobs using tasked-based estimating or your templates.
1. Go to Project Details.
2. Click on the Scope.
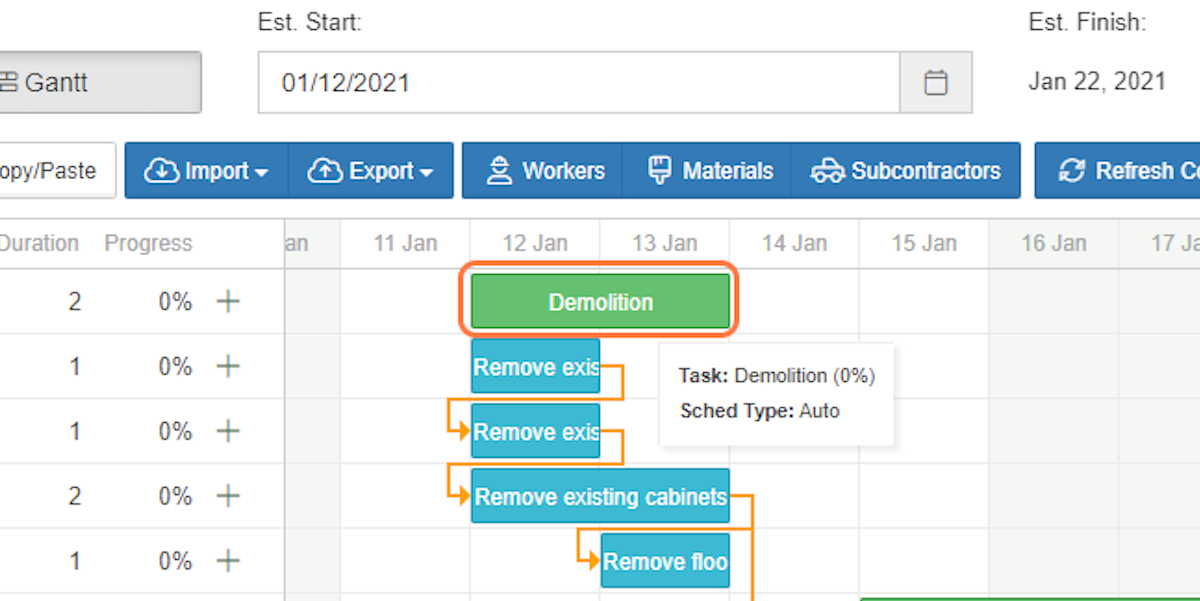
3. In your Gantt chart, the green rectangles represent the Tasks or Price Lines on your Estimate/Contract.
If you don't see a Gantt chart, it's likely because the job has not been scheduled. Add the job to your schedule first.
4. The blue rectangles represent the Subtasks, or cost items for the work order.
.png?width=688&height=270&name=Multi%20Day%20Project%20Ganett%20Chart%20(2).png)
5. You can drag and drop these subtasks to different days, as needed, and it will extend the total length of the whole task and project.
6. You can also drag the edges of the subtasks to extend out that particular subtask across several days.
7. Another way to add multiple days to a project is via the Grid View, and editing the subtasks. This can be done on the fly, or as part of your template.
8. Once you click into a subtask, you can use the "start date" and "finish date" toggles and the calendars to update the dates.
9. Remember to Save & Close.
10. One final way to add days to a project is by assigning laborers to the job.
11. Open a subtask, and click on the assignments tab.
12. Once there, you can add employees or subcontractors and update the "estimated effort hours" time to reflect how many days the project should take.
13. Here I've updated the assignments to add more hours to three subtask.
14. Always remember to save!
15. And now my multi-day project's Gantt chart looks like this!

Multi-Day Projects using Price Book
1. Go to Project Details.
2. Click on Scope.
3. Just like above, you can go to the Gantt chart tab and use the subtask rectangle to extend the project across several days.
4. If you don't have a subtask (blue rectangle), you can easily add one by going over to the Grid view.
5. Click on New Task.
6. Type in what you want your subtask to be called (install, labor, demo, painting, etc).
7. Select the Task Group for this subtask to be connected to.
8. Click on Save & Close.
9. In this example, I now have five subtasks and can break the project up as needed.
10. If you'd like to add subtasks to your projects by default, you'll need to update your Price Book settings. First, click on Admin.
11. Click on Price Book.
12. Go to the Cost/Expense tab and click on New Cost / Expense.
13. Call this whatever you'd like. (Install, Demo, Painting, etc).
14. Save it!
15. Then you can navigate to your items to add this cost/expense to any of your projects.
16. Choose your item.
17. Click on Add Existing in the cost/expense area near the bottom.
18. Add your expense.
19. Click on Add.
20. And remember to always save and close!
Utilizing Predecessors
How to use predecessors in Builder Prime for Project Management
1. Go to the Project Details - Grid View.
2. Click on a subtask.
3. Click on the Predecessors tab.
4. Use the drop-down menu to choose another task as a predecessor.
5. Click on the + to add it.
6. Click on Save & Close.
7. You can choose as many subtasks as you'd like to have previous tasks as predecessors.
8. You can also add in "lag time" if you need to delay this task starting behind its predecessor.
Note that lag time is represented in days and not hours here.
9. Click on the + to add it.
10. Click on Save & Close.
11. Once added to the schedule, your Gantt chart will look something like this:

-1.png?width=100&height=75&name=original-tar-ruler%20(1)-1.png)