How to Create a Project Estimate Using Task-Based Estimating
Accurately bridge the gap between your Sales and Production pipelines.
This article deep dives into one of our two estimating tools. For more information on our Price Book estimating tool, check out this article.
Overview
Let's break down how project estimates are created within Builder Prime. Once we create a new project, we'll record some initial information such as project name. Once we save this project record, we'll begin the process of building the estimate by adding tasks in the Tasks tab.
* Remember, you are able to create Project Templates, which can be imported automatically rather than starting from scratch with all new tasks.
Keep in mind that this article demonstrates just one example of how you might approach a project estimate. The software is very flexible to be able to handle just about any way you might want to build your estimates. Your Builder Prime Account Rep can help you figure out the best approach for you and your company.
All About Project Tasks
Project Tasks have multiple purposes in the Builder Prime, and serve as the glue between your sales and production processes.
When we are discussing Project Tasks in the context of a Project Estimate, it is best to think of them as the Scope of Work that you will be estimating for your customer. Here is an example of how you might create Task Groups and Subtasks to represent your scope of work:
Tasks Tab:

From the Tasks tab, you will define the scope of work using Task Groups to attach a price, and Subtasks for employee scheduling and accounting for job costs.
Task Groups: These will represent the main line items (or groupings) on our estimate. We can set prices (what to charge our customer) for each of these Task Groups. For an itemized estimate with multiple line items, we'll use a Task Group to account for each item. Task Groups will be displayed in bolder text with a folder icon to the left.
Subtasks: These represent the actual work to be completed, and will account for our job costs (i.e. what the work will cost our company to do). They can also be used to communicate additional details about the scope of work in the estimate. Labor costs, Material costs, Subcontractor costs, and Equipment costs will all be recorded within a subtask. Subtasks will be indented in non-bold text underneath the Task Groups.
For some companies or projects, you might build out a Scope of Work with multiple different Task Groups with several subtasks under each one. For other companies or projects, you might have a single Task Group with some details in the notes, and either 0 or 1 subtasks underneath it. It all depends on your company and the type of project you are estimating.
How to Build an Estimate
1. Starting from scratch
Find or create your client in Builder Prime and add a new project. Now, click on the "Scope" tab.
Click on the drop down "Other options to create the scope of work" and select "New Task/Line Item from Scratch". This will allow you to start a project estimate from scratch. While Import Tasks allows you to import a pre-made Project Template to save time and effort.
2. Create a new Task Group
Clicking 'New Task' will start a new Task Group. You'll want to name this Task Group as the line item that will be listed on the contract. You can set a price for this Task Group now from this page, or we can set a price later. More on pricing further down in this article.
Once this Task Group is created and saved, click "New Subtask" at the bottom of the window. Adding a Subtask will allow you to record Labor, Material, Subcontractor, and Equipment costs for the job, as well as schedule your field team for production. * If you don't wish to calculate job costs or use scheduling until you have a sold job, you can always come back to this part later, or you may skip job costing and scheduling altogether if you prefer. If you would like to skip over this step, you can skip ahead to #6 Pricing Task Groups below.
3. Create a Subtask
A subtask will be used for job costing and production scheduling. You'll account for Labor and Subcontractor costs in the 'Assignments" tab, Material costs in the "Materials" tab, and Equipment costs in the "Equipment" tab.
3a. Assign employees, subcontractors, materials, and/or equipment to account for job costs
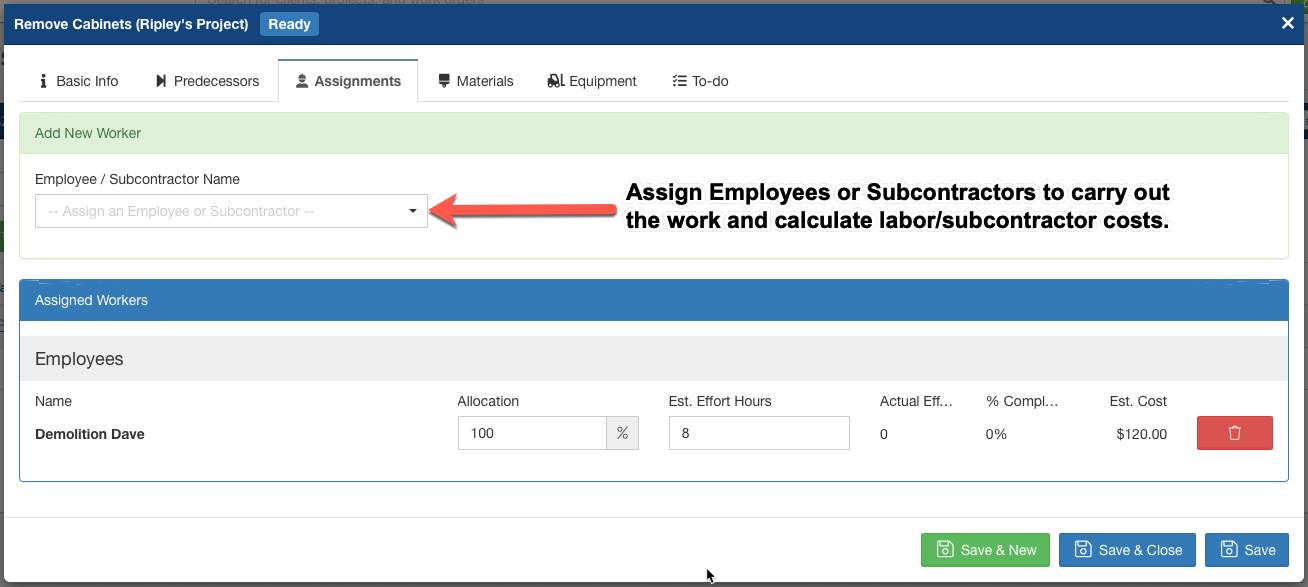
We've assigned our employee, Demolition Dave, to carry out this subtask (Remove Cabinets). The Est. Cost here is calculated by the number of hours estimated, 8, and Dave's hourly rate ($15/hr) as defined in his Employee Record in Admin > Employees.
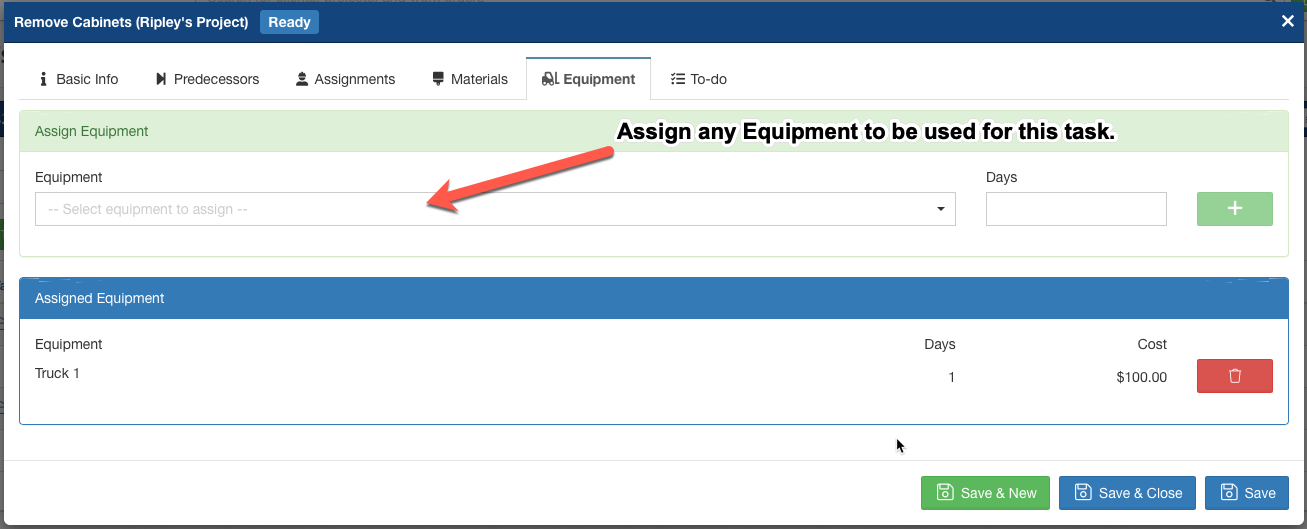
We've added the use of a company truck for this Subtask (Remove Cabinets). The Est. Cost here is calculated by the daily cost as defined in Admin > Configure > Equipment.
5. Create any additional Task Groups, following steps 2, 3, and 4 above.
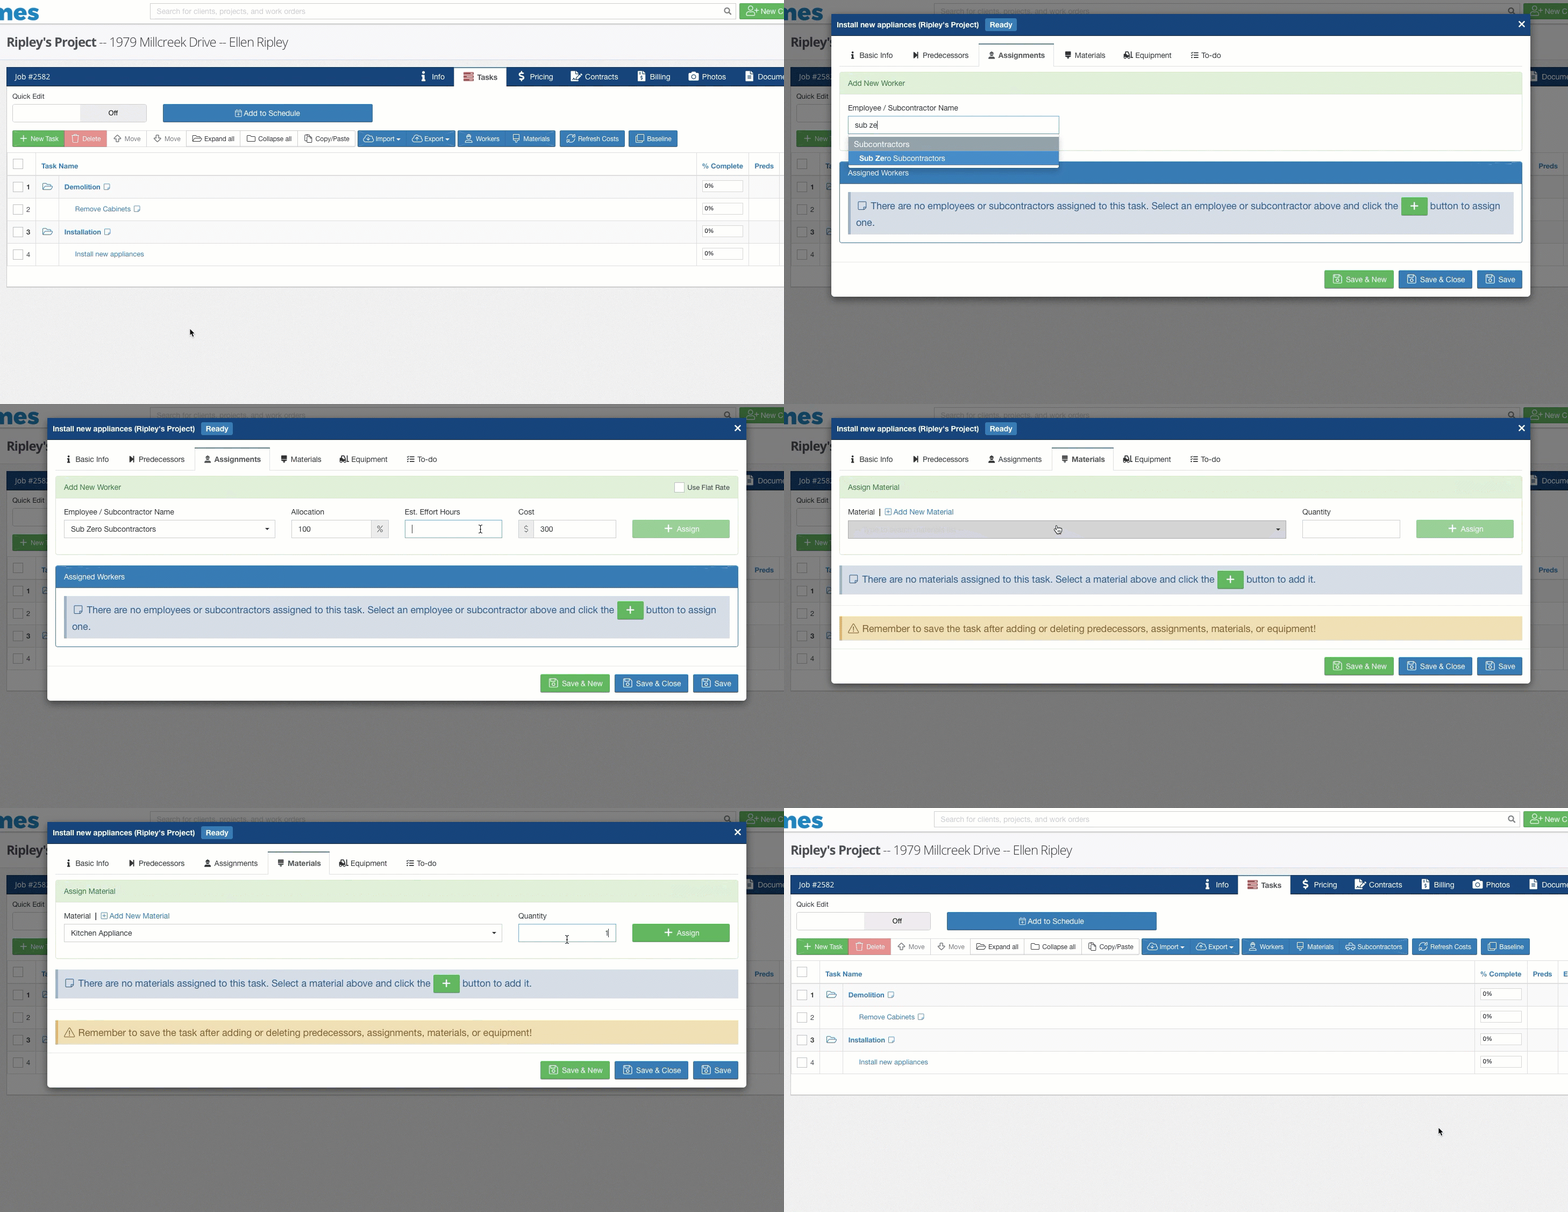
Above, we created a second Task Group (Installation), and another Subtask (Install New Appliances). In the Subtask, we assign a Subcontractor and add Materials for the task.
6. Pricing Task Groups:
Now that you've created your Task Groups, and perhaps even have Subtasks for job costing and scheduling, let's add a price tag to each Task Group. There are two places where you can set your prices:
- Pricing tab on the overall project: We recommend this approach if the way you price jobs is on the simpler side, or if you want to price based on the cost markup with different markup rates for labor vs. materials vs. subcontractors vs. equipment.
- Pricing tab on the Task Group (as demonstrated below for the first task group - Demolition): We recommend this approach if you need to do quantity-based pricing, e.g. price per square foot, or if you want to set/manage your pricing for your Task Groups in you project templates.
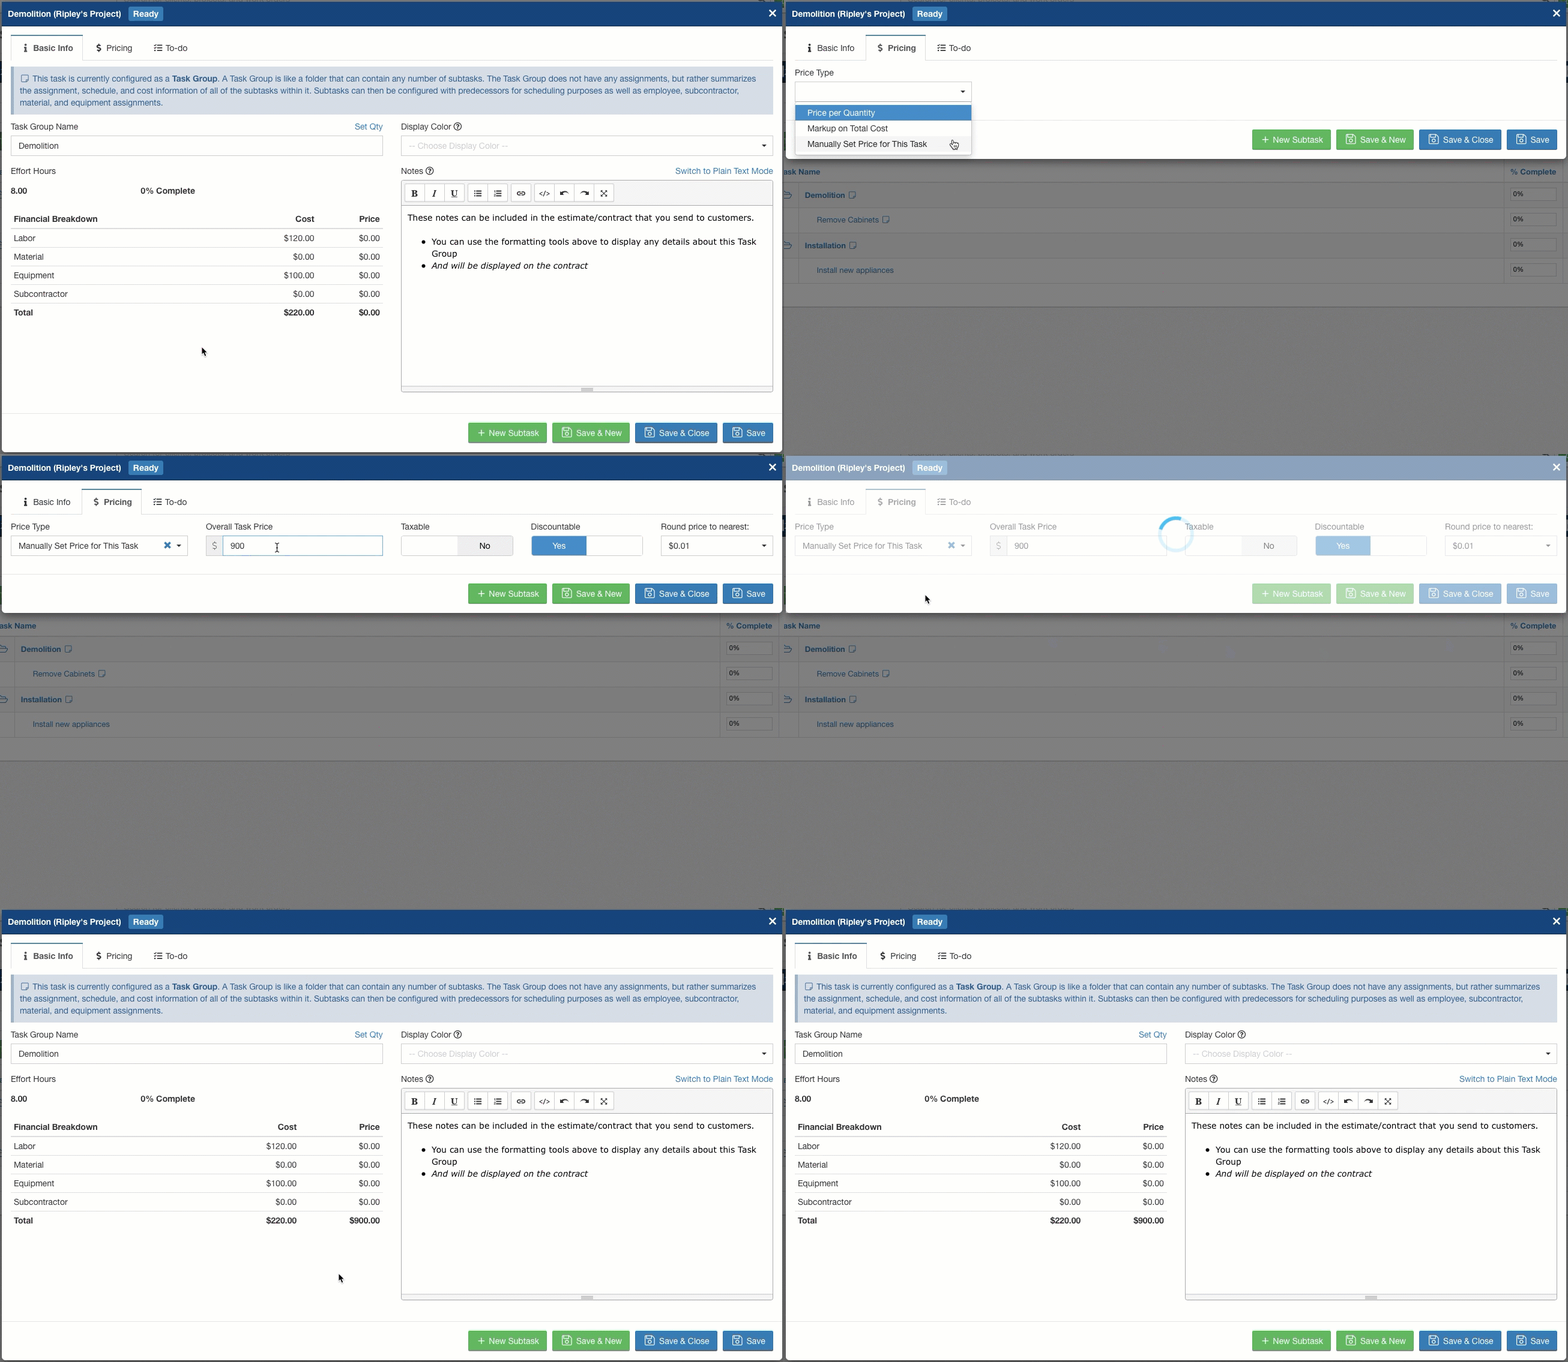
You are able to set a price for a Task Group with a few different methods; manually setting a price, by mark-up percentage on the associated job costs, or a price per quantity (for square feet, linear feet, united inches, per unit, etc). In this example, we're manually pricing the Demolition Task Group for $900. On the Basic Info tab, we can see the total price alongside the accumulated cost from the subtask, Remove Cabinets, below.
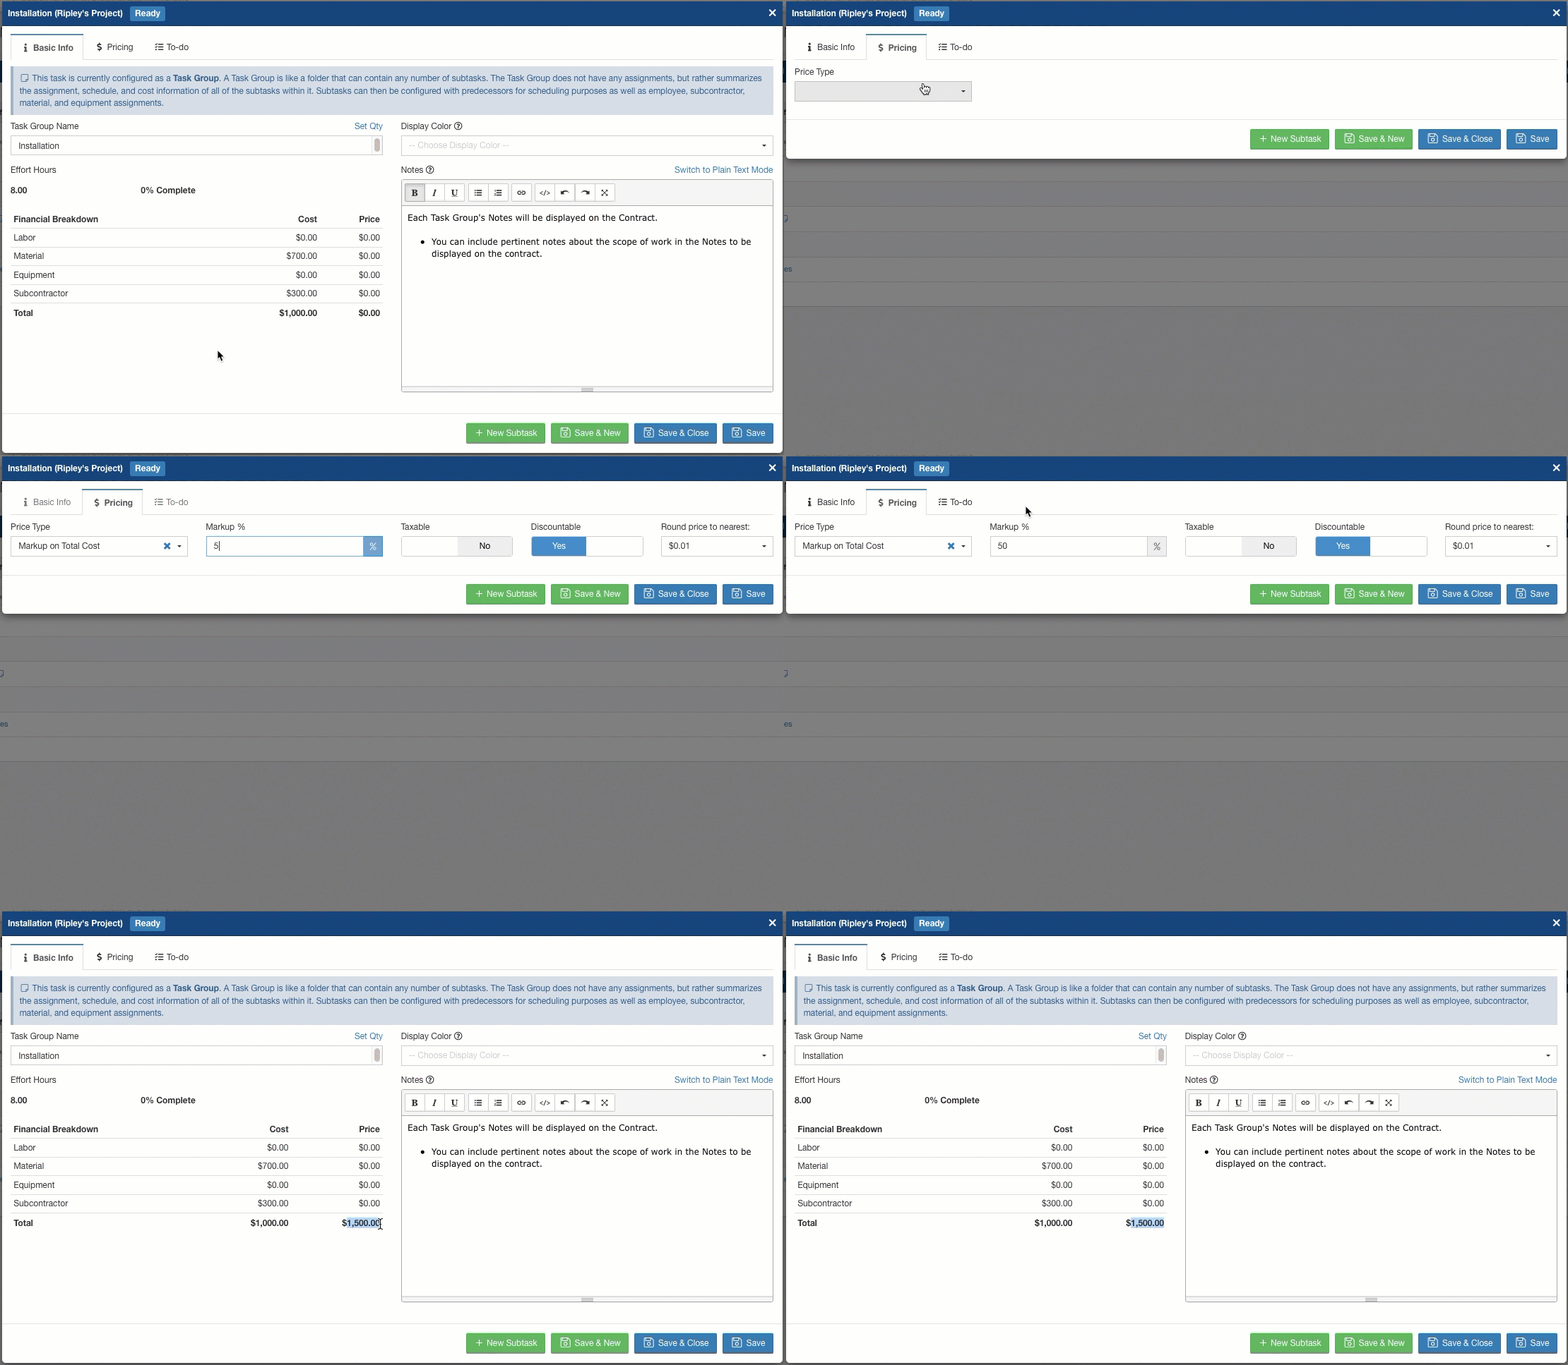
For the Installation Task Group, we're setting the price by marking up the total cost by 50%.
When we go over to the Pricing tab on the Project as seen below, you can see your calculated Gross Profit, Profit Margin, and the Grand Total Price. Our pricing is already entered here because we used the second method of pricing - directly in the Task Groups. Otherwise, we could have entered our pricing in this section as well.
7. Generate a Contract + Obtaining signatures to sell the job
Once we've defined our scope of work and set prices for the Task Groups, we can generate a Contract. From the Contracts Tab, click "Create a Contract."
When generating a contract, you have many options for how you want the information displayed. For example, you can choose to toggle off the Notes from the Task Group, decide to display only a grand total price rather than itemized pricing, optionally tweak your default Terms and Conditions, display a payment schedule include, etc.
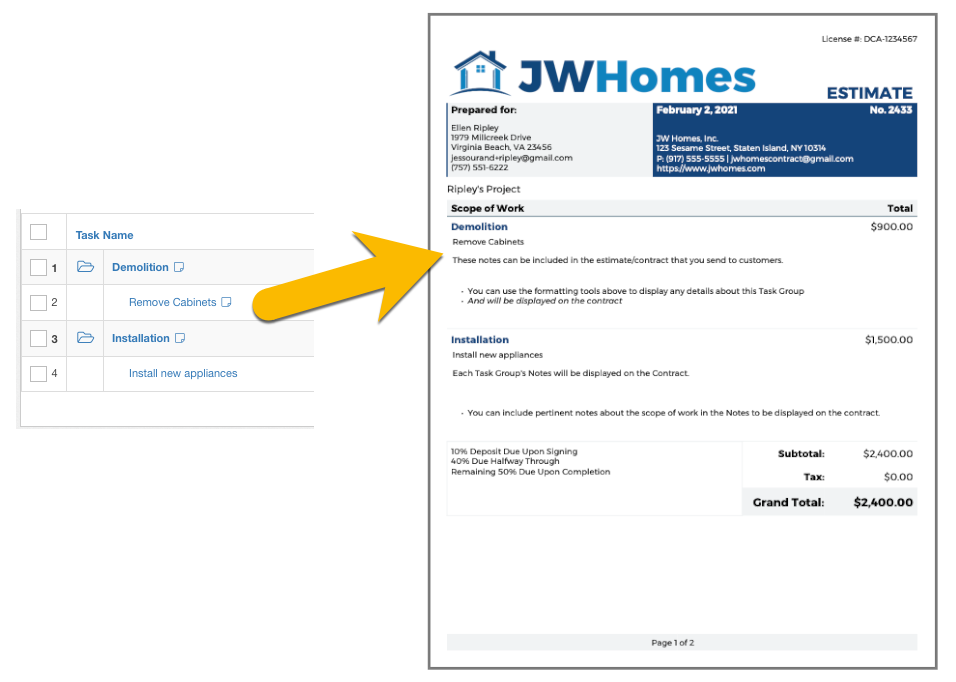
The contract is generated! Taking the information from the Tasks tab, we've built a project estimate from scratch! Our company logo and company colors make for a custom-branded look for your contracts in Builder Prime.
Once the contract has been generated, you can send the contract to your customer directly from the platform for electronic signature. Once signed, the contract will be marked Sold, and we can move forward to invoicing and getting the project scheduled for production. Nice!
-1.png?width=100&height=75&name=original-tar-ruler%20(1)-1.png)